"Be yourself, take control of your life." -Emma Bunton The movement, pace, editing techniques and imagery we used were inspired by many films and videos, mostly from the avant-garde world of cinema. All paragraphs below refer to the picturedepicting the scene, displayed at either side. The rewind and fast-forward motions used in this scene were inspired by Dannii Minogue's music video for 'You Won't Forget About Me', as shown below. I was inspired by this technique because of the sense of rapid pace it created, as well as applying an interesting perspective to what would otherwise be a simple motion of walking-making the shot more dynamic and exciting.
The eye-catching, strange motion found in this scene, as well as the red cone imagery and body composition, were inspired by the artist Steven Klein and Madonna's 2003 collaboration, 'X-STaTIC PRO=CeSS'. The art installation originally ran as a set of 5 minute clips of different scenes, using quick interchanging shots that would repeat themselves and run backwards and forwards. A compilation of these scenes titled 'The Beast Within' was later used as an introduction to Madonna's Re-Invention Tour, as shown below. I was inspired by this avant-garde piece because of its ability to shock and unsettle the viewer using very little imagery, and relying on repetitive editing techniques to create an atmosphere-as well as being highly unusual and thought-provoking.
This shot used at the beginning and later in the video was inspired by an editing technique used in many films and videos: slow-motion. An example is the new Sophie Ellis-Bextor video for 'Bitterwseet', as shown below. I found this movement technique very effective, as it creates a strong sense of tension, and builds a mysterious environment for the audience.
"All sins are forgiven once you start making a lot of money." -RuPaul The programs I used to create the website are Adobe Dreamweaver CS2 and Adobe Fireworks CS2. I created most of the website using Dreamweaver, due to its convenient html properties. I have experience in html, so this proved to be beneficial. I used Fireworks to create the buttons displayed on the page.
My first intention when creating the page was, as shown in previous posts, to make the trailer I created the focal point of the page. To do so, I needed to use a simplistic layout that would accentuate the video-whilst remaining stylistic and pleasant to look at. First, I intend to use a black background. This gives the website a darker setting, which suits both the trailer and the artist's image. To do so, in Dreamweaver, I clicked the background, and selected black in the options box beneath the html-editing area ().
In a similar manner to the way the website trailers I researched would play on repeat, I decided I wanted my video to do the same. This ensures that any audience member would have every opportunity to watch the video. Unfortunately, Youtube does not have an option for me to loop the video-so I reached the conclusion that I would have to convert the trailer into a compatible Flash file, and embed it onto the website-using Dreamweaver's option to loop the file. Luckily, I had already purchased video converting software, called 'Magic Video Converter'. The converter converts any video file into the available outputs-one of which being a '.swf' video file-a flash file. I simply clicked 'Browse...', selected the trailer, selected 'To SWF', and selected 'Convert'. The optimum settings were already prepared for conversion, so I did not need to touch the other drop down menus. The .swf file was created succesfuly, and I was able to embed the file easily into Dreamweaver-simply by clicking Insert, Media and then Flash. I then select the swf file, and Dreamweaver imported the file and created the html code automatically. I then simply dragged the video to a smaller size, so it took up less of the page.
I then created the interactiveroll-over buttons using Fireworks. To do so, I selected a black background so that the button blends into my page, and then used a moderately brown font to make sure the font wont stand out until the viewer's mouse hovers over it. I then Duplicated the frame, so that the 'rollover' frame I create would be an exact imitation, with only slight changes: -->
On this new frame, I changed the color of the font to a brighter red. This red coloring suits the color scheme of the video, ensuring the text stands out. My next action is to make the button a hyperlink-so I have to create a Rectangle Slice around the new frame's letters. To do so, I click Edit, Insert, and then 'Rectangular Slice':
I then click on the slice, and then select the Properties panel, and change the link to one of the appropriate pages I have designed, which contain either the title of the page, images, or a direct link to YouTube, containing the full music video. Then, I again click on the slice, and select Window, Behaviours, and then +. I then choose Simple Rollover, which changes the behaviour of the frame, so that it appears when the mouse rolls over the previous frame: = -->
To finish, I click on File, then Export, and then I select which location I wish to place the button, in html form. My next intention is to import the buttons into Dreamweaver. Whilst Dreamweaver normally simply imports html, since the button was created in Fireworks, its structure is different from conventional html. So, to import the file succesfully, I click on an empty space, and select 'Insert Fireworks Html'. I then select the file I wish to import in this window:
Using this method, I imported all of the buttons successfully. My next intention was to organise the buttons neatly. So, I used the Table feature, available at the top of the page. Then a box opens (shown to the left), and I created the table to match the number of buttons, as well as the trailer video. I also included credits and links to connected sites such as Incompetech and Myspace, to increase the authenticity and convergence of the page. My website appeared to be finished.
But, I was faced with one more issue. The lack of colour felt too simple, and I felt there was not enough of a representation of the colour purple, to match up with the artist name, Ultra Violet. I did not want the artist's name on the page, to add a sense of mystery. Mystery is another way to build up hype for an artist, as confusion for viewers may lead to intrigue. An effective example of this is in the recent iamamiwhoami viral campaign:
So, I instead decided to embed a picture from the 'Perfect Circle' photoshoot, and zoom in on a picture that would highlight the presence of purple in the artist's image. I took one of the pictures that underlined the beauty of Daniella's lips in one of the 'Glittery Lips' shots, opened it in Photoshop, zoomed in on a partition of her face, Cropped it out, Copied it into an empty window, and saved it as a high quality .png file. Then, in Dreamweaver, I selected 'Insert' then 'Image', and simply selected the image, and dropped it into the table-thus my website was finished:
"I was a veteran, before I was a teenager." -Michael Jackson
A DV tape. Unfortunately, the DV tape that had been provided already had footage on it, so we had to 'Black Out' the tape before we could proceed to film. Blacking Out the tape requires putting the tape into a camera, placing a cap over the cover of the lense so that its black, rewinding the tape to the beginning, and filming the cover of the camera until the tape is fully recorded. Then, we rewinded to the beginning, and began filming.
A Canon DM-XL2 Mini DV Camcorder. Lana and I had prior experience with this same model of camera in the past, filming our preliminary tasks and our AS Level Media coursework. This gave us a head start with our understanding on how to use the camera and its capabilities, but when filming, we learned more-such as the ability to change the brightness of the footage, using the round dial on the left side of the camera, located beneath the viewing hole.
A Mini DV player. This player allowed us to insert the DV tape, and then transfer the videos on the tape over onto the computer, using the Capture function in Adobe Premiere.
A tripod and a dolly. The tripod connects to the dolly, allowing the steadily held camera to be moved around smoothly. Whilst most of the filming this time round was done via placing the camera on one's shoulder, our prior knowledge into using this equipment from AS levels gave us the upper hand on the occasion we did use it.
Dual screens. This allowed me to have quick access to a wider variety of programs, such as using all the features on Adobe Premiere on a wider scale. This was useful because there was more room to interact and focus on my editing.
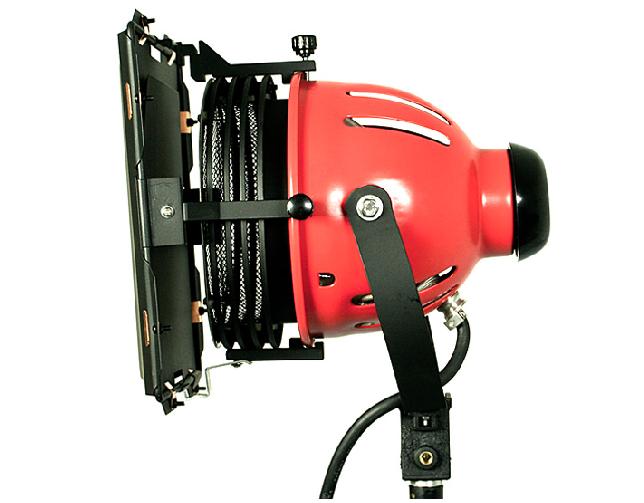
A redhead. This bright light enabled us to film most of the scenes with the swaying lights, such as the needle eye shot. The panels at the front allow us to shape how precise the direction of the light is, which helped to make the angles of lighting more effective. An issue I had with this piece of equipment is that it heated up very fast, and I had to be careful to not break the bulb.
The Adobe Premiere Shortcut Keyboard. This color-coded piece of equipment allows me to use Adobe Premiere's functions a lot faster, without relying on mouse control and so on. For example, pressing 'C' activates the Cut function, and pressing 'V' returns back to normal mouse control.
"For me, it's an experiment to see what people are gonna think of it. " -Utada Hikaru
All shots are in order of when they appear in the video, and all paragraphs refer to the image/scene displayed on either side.
The opening scene is a mid-closeup shot that displays the model pushing forwards towards the camera, with a look of pure anguish on her face. The red cone implements the presence of fashion. The credits give details to the viewer, so if they are interested, they know whom to look for, what album its from and so on. The music is another Kevin MacLeod track, and is ominous and haunting, creating an unsettled environment for the viewer along with the upsetting imagery-heavily influenced by German Expressionism conventions. This is the first costume we see.
The next shot is a closeup of the model's foot as she puts on a shoe, shot from a gap in the railing of the staircase. This establishes that the character is preparing for something, and the dark lighting and 'spotlight', created using the torch worn by the model later on, enforces a dramatic tension. The imagery is very similar to film noir, which too was influenced by German Expressionism.
This mid-shot uses the 'Mirror' effect available in Adobe Premiere. By changing the degrees of the direction at which the mirror should be placed, I created this effect. The shot establishes the character continuing to prepare, putting on a scarf in what seems to be a mirror, implying shes in a changing room. The 'Mirror' effect enhances what could otherwise be dull imagery, whilst giving it more of an alternative edge. This is the first costume change, establishing the fashion based essence of video.
This tracking shot begins to build the tension of the video. The model hurriedly walks to the door of the changing room, and the audience begins to wonder where she is going.
This is a match-on-action shot to the previous shot, as she walks through the door and comes out in this shot. This shot again uses the 'Mirror' effect, stylising the image of the model walking to her destination. The tension is still being built, especially through the music.
The scene then cuts to a different period of time, which is apparent due to her different clothing and hairstyle, as well as the establishing shot of the scenery. This tracking shot further implies the tension of the video, and as the haunting instrumental fades into our song, Perfect Circle, the model hides to the side of the home. This is the second costume change, further establishing the theme of differentiating fashion. The dark color scheme, mixed with the red coloring (applied via the brightness settings on the camera), continue to enforce the film noir prospect.
This mid-shot/tracking shot invites the viewer onto the empty concert stage, where the model takes a seat and prepares for the song. We repeated the opening instrumental by 'Cutting' and 'Copying' the audio on the Timeline in Adobe Premiere, using the audio effect 'Fade Into' so that the audio flows smoothly. I contacted a lighting specialist to help us make this shot more thorough with different colored lights, but the lighting technician failed to show, so the single spotlight was controlled by the male actor, whilst the blue lights were turned on once by the model.
To create the rewind/play motion of this mid-shot required changing the 'Speed/Duration' settings in Adobe Premiere. To do this, I would cut one section of the video, and then copy it twice. I would then put them together, and right-click the 2nd video, and selecting 'Speed/Duration'. I then check the box titled 'Reverse Speed'. This way, the video plays Daniella walking forwards, backwards, then forwards again. This was heavily inspired by research I made into the electro-pop video 'You Won't Forget About Me' by Danii Minogue, as shown below:
This quick, dramatic closeup kicks off the beginning of the vocal part of the song. The lighting is incredibly mysterious and the angle of the face is seemingly inhuman-further enhancing the unsettled atmosphere rooted from German Expressionism.
This long shot begins the vocal section of the song. It also fully establishes the light-clip attached to Daniella's chest, acting as the brightest light in the shot, with enough time for the viewer to study the image to decide on what the light is/could be. This lack of clarity gives the viewer more to think about, which may attract them closer to the video.
The next few shots are a variety of shots detailing the model's walk down a hill towards a bridge. These rapid shots, such as this silhouetted long shot, strengthen the tension of the video. Daniella puts on a hard face, showing anger-and the following silhouette shows the almost menacing nature of the character. These dark themes are presented in an avant-garde manner, what with the alternative imagery, such as the light-clip being the only visible light on the hand-on-hip confident silhouette surrounded by blood-red shades, establishing the malice within the character.
These two quick closeup shots, presented in accordance to the beat, invite the viewer into yet another look for Daniella. Although the images flash quickly, the brightness of the image contrasts the dark imagery shown previously, which will hopefully create an impression on the viewer's mind.
The viewer will recognise the previous images in the projection, but will also be invited into watching Daniella sing the song whilst performing in this mid-long shot. The projection itself shows the research made into Andy Warhol'sExploding Plastic Inevitable, and his use of projections within. It also shows evidence of post-modernism, as the use of the projection blends reality with a mediated representation.
This collection of birds-eye view shots were edited in a way that's similar to the 'Mirror' technique, but instead of being in the same shot, we instead used the 'Horizontal' effect on the images, so that the image cuts back and forward between the different sides of the reflection. The shadow was originally accidental as I lent in front of the light, but proved to be effective, so I filmed it with my shadow covering one of her eyes. The stance is also very provocative, applying to my research into the 'Sex Sells' theory.
This set of closeup shots are the beginning of the end, as the impending themes of anger and insanity in the video become more and more apparent, as the imagery begins to speed up in the cutting process. This continues to align with the concept of German Expressionism, where insanity and madness were looked into thoroughly, and were presented in a stylised manner.
This fast-pacedcloseup shot of Daniella blinking was amplified by right clicking on the clip in Adobe Premiere, selecting 'Speed/Duration', and turning the speed up notably. This continues to heighten the pace of the video, and the image itself is very effective and dramatic. I intend to use an incredibly slowed down version of this shot as the backdrop of the DVD menu.
To create the flashing effect in this mid-shot, Lana turned the lights on and off rapidly. This continued to help raise the sense of rising speed and craziness in the video. It also shows more references to the 'Sex Sells' theory, with Daniella's cleavage being moderately visible.
This long-shot of the light was actually filmed by accident-I was trying to turn the camera to Daniella, and my male actor, Jonathan Cobbing, had turned the light to face in my direction as a joke. Whilst editing I found the shot, and was pleased to find that it was very effective, and proved to be a match-on-action shot with the next shot, creating a continuous flow.
I edited this mid-shot and cut it so that as the light-clip faced the camera, the video would begin. Therefore, the previous shot of the spotlight becomes a match-on-action shot into this shot, as the bright lights blend into each other and flow via the cut. This shot also presents a new location-a lamp-post which Daniella 'pole dances' on, enticing the viewer.
This mid-shot takes us back to the outfit from the opening of the video. The outfit is notably revealing, as we placed the straps below her shoulders. I purposely filmed the shot whilst shaking the camera, then edited the speed of the shot in the 'Speed/Duration' menu, making it faster. The blue background is in fact a chroma key, designed to present other images via editing-but I instead used it as a stylistic background, which enhanced the image of the red cone.
This scene details a hooded figure going behind the stage, and shutting the concert down via a panel, shocking the singer. The man then goes on to kick her out, establishing himself as a member of authoritative staff, as he has a card that opens the door to leave, from which he throws her out. This collection of shots are all in fact an intertextual reference. Whilst they are all synced to the beat (save for the brief sequence when the music stops, as Daniella is removed from the stage), it is in fact a reference to the first few minutes of Lonesome Cowboys by Andy Warhol, in which the characters awkwardly cut to different places, although not in sync to the dialogue.
This closeup shot finally sets off the last 'explosion' of experimental imagery, implying the avant-garde feel. The irregular increase in speed (edited in the Speed/Duration menu) instills the feeling of unease and the essential madness of the video, further referencing German Expressionism. To make the swaying light, Lana held a large spotlight, and swung it side to side. The dramatic presence of needles so close to Daniella's eyes also project a sense of horror-whilst at the same time appearing alternative and 'fierce', which is a commonly desired image in the electro-pop industry. Lady GaGa is a clear example, when she wears glasses containing razorblades that point directly towards her eyes, at the start of her 'Bad Romance' video:
This mid-closeupshot is truly the beacon of German Expressionisticinsanity in the video. With the irregular image of Daniella swaying back and forward rapidly with a painful look on her face, which then speeds up and rotates backwards and forward, losing all control. This shot presents the loss of control over the character's feelings, and sets her anger over the canceled concert in motion. This leads the viewer to believe there is more to the person that canceled the concert than what was let on. The shot then leads on to a shot of Daniella shaking her head in pain, reaching the 'peak' of her anger, as a menacingly anxious image of her can be seen blended into the background. I created this shot by cutting the shot several times and using the 3-video rewind/play forward process on several occasions, and then swapping the order twice. This movement is heavily influenced by Steven Klein's and Madonna's 'X-STaTIC Pro=CeSS' exhibition, as shown in previous posts. The background of this mid-shot was one of the shots that I made at the spur of the moment. Whilst waiting for Daniella and Jonathan to arrive on the set, I found a glitter dome in my brother's room. I sat the camera in front of it and zoomed in so that the dome filled the shot. I then shot the glitter, changing the focus so that different distances could be seen. Then, I reversed the speed in the 'Speed/Duration' menu to give it more of an ethereal quality as the glitter flies upwards, and on the time line in Premiere, placed it above the shot of Daniella sitting. I then decreased the Opacity of the shot, so that both the shot of Daniella and the glitter could be seen, creating an intriguing effect.
This quick succession of close-up shots that interchange between the glittery mid-shots present the constant sense of speed, so that the video does not slow down after the previous red cone scenes.
This mid-closeup shot is the last shot that is inspired by Danii Minogue's 'You Won't Forget About Me' music video. The scene is a German Expressionist-basedavant-garde scenario, in which the artist is in a completely nonsensical situation, wearing a royal crown and climbing through what appears to be the interior of a bed, with the cover being held up by Lana in the process. The mise-en-scène for this scene was inspired by Pixie Lott's 'Mama Do (Uh Oh Uh Oh)' music video, another electro-pop artist I researched into:
This is the last shot that uses the 'Mirror' technique. This time, I changed the degrees of the angle so that it was a complete 180 flip, and I placed the image further into the centre, so that it was a complete reflection-giving the appearance that she is talking to herself. This scene shows that the video is coming to an end, as she is finally crossing the bridge she was heading towards. The quote 'I'll cross that bridge when I get to it' provided inspiration for this part of the plot.
This closeup shot is heavily abstract, and its alien appearance is almost frightening. To create this effect, I used the 'Echo' feature, and amplified it so that it appears she is moving in a daze. I also used the 'Brightness' feature, and elevated it-this contrasted the image, and surprisingly made it look more sinister and inhuman-opposed to the idea of darkening the image instead.
This collection of shots was shot by Lana on the sofa. Lana actually filmed only one shot of Daniella lying on the sofa. Whilst editing, we felt the shot was too still, so we used the 'Zoom' feature and cut the video separately, cutting to different closeup shots of her body to the beat, and then cutting to the full long-shot. The 'Zoom' feature allowed us to again present the theory of 'Sex Sells' as well as selling the fashion aspect of the video, zooming on on her shoes and her buttocks.
Much like the other shots containing Jonathan, I intentionally made it difficult to see his face. This will hopefully ensure that the viewer's attention will not be entirely strayed from the artist's. To hide Jonathan in this tracking shot, I moved the camera whilst shaking, making it difficult to concentrate on his face. Jonathan then goes into the house we saw Daniella hide next to earlier on, implying to the audience that the first time we saw the house actually took place after the concert.
As mentioned in the Fashion post, this close-up shot is an intertextual reference to Luis Bunuel's French film 'Un Chien Andalou', referencing the opening scene in which a woman has her eye sliced with a razor/knife. It is also a continuation of the scene in which she was climbing through the bed, as the viewer can see from the bed she is lying on.
As the story comes to a close, we see the artist's now-signature light hidden alone against the pitch black backdrop in a long-shot. This tells the audience that the artist hid there after the concert, and due to the dark nature of both the shot and the film, it is clear it is a for a negative and menacing purpose. The previous shot of the knife also nods towards possible things to come.
Instead of what could have been a presumed murder, the shot cuts back to the artist knocking on the door, and the door is answered. She slaps the man on the last lyrics, 'you'll come around', flaunting her confidence and concluding the video-although as the camera trails off, the viewer is left to imagine what happens after.
Although, this final closeup shot of a glass of wine being pored shows a sign of success, and whilst accompanied by the mysterious lighting, may refer to the final outcome of the events of the video. Whilst the credits appear again, conveniently shaped to not block the imagery, the viewer is left to decide on how the plot would end. I have had prior experience dealing with open-ended films, since my AS Level production was a horror story with an open ending, allowing the viewer to decide on what happened based on stylised imagery.


 A
A 
 A
A 


